#HOW TO GET IP ADDRESS OF RASPBERRY PI
Explore tagged Tumblr posts
Visit Tumblr Blog
Explore Tumblr blogs with no restrictions, modern design and the best experience.
Last Seen Tumblr Blogs


Fun Fact
In 2020, 27% of US Tumblr users had an annual household income of over $100,000.
Text
Setting up a Raspberry Pi is always an adventure, and our latest project has been no exception! We've been diving deep into the world of network configuration, and after a bit of head-scratching (and a few "aha!" moments), we've made some significant progress in understanding how to get our Pi to share its internet connection.
Initially, like many, we fell into a common trap. Our goal was to share the internet connection from our Raspberry Pi, and our first thought was to assign a static IP address to wlan0 – the wireless interface. The logic seemed sound: wlan0 is how the Pi connects to the internet (via a hotspot, in our case), so surely that's where the magic needed to happen, right?
Not quite!
After some experimentation and a healthy dose of troubleshooting, we realized a crucial distinction. While wlan0 receives the internet connection, it's not the ideal interface for sharing it in the way we envisioned. Think of it this way: wlan0 is like the person receiving a package at the door. They've got the package, but they're not the ones distributing it to everyone else in the house.
This led us to eth0 – the trusty wired Ethernet port. And that's where the real breakthrough happened! We had a lightbulb moment: eth0 is perfectly suited for sharing the connection.
Here's why eth0 is our new best friend for internet sharing:
* Dedicated Connection: eth0 allows for a direct, dedicated connection to another device, like a router or even another computer. This is ideal for creating a stable and reliable shared network.
* Logical Separation: By using eth0 to share, we can keep the wlan0 interface focused on its primary job: connecting to the internet. This simplifies the network topology and makes it easier to manage.
* Foundation for a Robust Setup: With eth0 as our sharing interface, we can now configure it to act as a DHCP server, enable IP forwarding, and set up Network Address Translation (NAT). These are the essential ingredients for turning our Raspberry Pi into a powerful internet gateway.
So, what's the plan moving forward?
Our focus has now shifted to configuring eth0. We'll be looking at:
* Assigning a static IP address to eth0: This will be the gateway for any devices connected to it.
* Enabling IP forwarding: This is the key to telling the Pi to route traffic between our wlan0 internet source and our eth0 shared network.
* Setting up a DHCP server (like dnsmasq) on eth0: This will allow devices connected to eth0 to automatically get an IP address from our Pi.
* Configuring iptables for NAT: This crucial step will ensure that devices on our eth0 network can access the internet through our wlan0 connection.
This project has been a fantastic learning experience, highlighting the importance of understanding the fundamental roles of different network interfaces. We're excited to get eth0 fully configured and unlock the full potential of our Raspberry Pi as an internet sharing hub.
Stay tuned for more updates as we continue to build out this network!
- I used ai for this post.
0 notes
Text
does making a vpn with raspberry pi
🔒🌍✨ Get 3 Months FREE VPN - Secure & Private Internet Access Worldwide! Click Here ✨🌍🔒
does making a vpn with raspberry pi
Raspberry Pi VPN setup
Title: Setting Up a VPN on Raspberry Pi: A Comprehensive Guide
In today's digital age, ensuring online privacy and security is paramount. One effective way to achieve this is by setting up a Virtual Private Network (VPN). While there are numerous commercial VPN services available, building your VPN using a Raspberry Pi can offer both flexibility and control over your network.
Why Choose Raspberry Pi for VPN?
Raspberry Pi, a low-cost, credit card-sized computer, is an excellent choice for hosting a VPN server. Its affordability and energy efficiency make it an attractive option for individuals and small businesses looking to establish a secure connection without breaking the bank.
Step-by-Step Setup Process:
Gather Your Materials: You'll need a Raspberry Pi board (such as Raspberry Pi 4), a microSD card, power supply, and an ethernet cable.
Install Operating System: Download and install Raspberry Pi OS (formerly Raspbian) on the microSD card using a tool like Etcher.
Update and Upgrade: Once booted, run sudo apt update and sudo apt upgrade to ensure your system is up to date.
Install VPN Software: Several VPN server software options are compatible with Raspberry Pi, including OpenVPN and PiVPN. Follow the installation instructions provided by your chosen software.
Configuration: Configure your VPN server settings, including encryption protocols, authentication methods, and user credentials.
Port Forwarding: If you want to access your VPN server from outside your local network, configure port forwarding on your router to redirect traffic to your Raspberry Pi's IP address.
Connect and Test: Connect your devices to the VPN server using the provided client software or native VPN settings. Test the connection to ensure everything is working correctly.
Conclusion:
Setting up a VPN on Raspberry Pi is a cost-effective and customizable solution for safeguarding your online activities. By following these steps, you can establish a secure connection and enjoy peace of mind knowing your data is protected. Whether you're browsing the web, accessing sensitive information, or connecting to public Wi-Fi networks, a Raspberry Pi VPN provides an extra layer of security.
DIY VPN with Raspberry Pi
Title: Building Your Own VPN with Raspberry Pi: A Step-by-Step Guide
In today's digital age, privacy and security are paramount concerns. With the increasing threats of hacking and surveillance, many individuals are turning to Virtual Private Networks (VPNs) to safeguard their online activities. While there are numerous VPN services available, some users prefer to create their own VPN for added control and customization. One popular method is using a Raspberry Pi, a versatile and affordable single-board computer.
Here's a step-by-step guide on how to set up your own VPN using Raspberry Pi:
Gather Your Materials: To get started, you'll need a Raspberry Pi board (such as Raspberry Pi 4), a microSD card, power supply, and an Ethernet cable.
Install Raspbian OS: Begin by installing the Raspbian operating system on your Raspberry Pi. You can download the latest version of Raspbian from the official website and flash it onto the microSD card using software like Etcher.
Configure Raspberry Pi: Once Raspbian is installed, boot up your Raspberry Pi and configure it according to your preferences. Make sure to enable SSH for remote access.
Install VPN Software: Next, you'll need to install VPN server software on your Raspberry Pi. OpenVPN is a popular choice for its robust security features and ease of use. Follow the installation instructions provided by the OpenVPN documentation.
Generate Certificates: After installing OpenVPN, generate the necessary certificates and keys for authentication. These certificates will ensure secure communication between your devices and the VPN server.
Configure OpenVPN: Edit the OpenVPN configuration files to customize your VPN settings, including server IP address, port, encryption method, and authentication details.
Start VPN Server: Once everything is configured, start the OpenVPN server on your Raspberry Pi. You can do this via the command line interface using the 'sudo systemctl start openvpn@server' command.
Connect Devices: Finally, connect your devices to the newly created VPN server using OpenVPN client software. Enter the server's IP address and credentials, and you're ready to browse the internet securely and privately.
By following these steps, you can create your own VPN with Raspberry Pi, giving you greater control over your online privacy and security. So why wait? Take charge of your digital life today!
Raspberry Pi VPN server
A Raspberry Pi VPN server is a cost-effective and convenient way to set up your own virtual private network. Running a VPN server on a Raspberry Pi allows you to securely connect to your home network while you're away or encrypt your internet connection when using public Wi-Fi.
Setting up a Raspberry Pi VPN server is relatively easy and requires minimal hardware and software. You'll need a Raspberry Pi board, a microSD card with Raspbian or another compatible operating system, and an internet connection. There are several open-source VPN server software options available for Raspberry Pi, such as OpenVPN, PiVPN, and WireGuard.
To set up a VPN server on your Raspberry Pi, you'll first need to install and configure the VPN software of your choice. You'll then need to forward the necessary ports on your router to allow external connections to your VPN server. After configuring client devices to connect to your VPN server, you can enjoy a secure and private connection to your home network from anywhere in the world.
Using a Raspberry Pi as a VPN server is a great way to enhance your online privacy and security without breaking the bank. Whether you need to access sensitive information remotely or simply want to protect your internet traffic from prying eyes, a Raspberry Pi VPN server can help you achieve your goals effectively and affordably.
Building VPN on Raspberry Pi
If you are looking to enhance your online privacy and security, setting up a VPN on your Raspberry Pi can be a great solution. A VPN, or Virtual Private Network, encrypts your internet connection and routes it through a server to hide your IP address and protect your data from prying eyes.
To build a VPN on your Raspberry Pi, you will need to start by installing a VPN server software such as OpenVPN. OpenVPN is a popular choice for setting up a secure VPN connection and offers strong encryption protocols for maximum security.
Once you have installed the OpenVPN software on your Raspberry Pi, you will need to configure it to create certificates and keys to secure the connection. This process involves generating a server certificate, a client certificate, and a key for authentication.
Next, you will need to set up port forwarding on your router to allow external connections to reach your Raspberry Pi VPN server. This step is crucial to ensure that your VPN can be accessed from outside your local network.
Finally, you will need to configure the VPN client on your devices to connect to your Raspberry Pi VPN server. This typically involves importing the client certificate and key and setting up the connection details on your device.
By following these steps, you can build a VPN on your Raspberry Pi to enhance your online security and privacy. Remember to keep your software up to date and choose strong encryption protocols to ensure the highest level of protection for your data.
Raspberry Pi VPN configuration
Title: Setting Up a VPN on Raspberry Pi: A Comprehensive Guide
In today's digital landscape, ensuring online privacy and security is paramount. One effective way to achieve this is by setting up a Virtual Private Network (VPN). While there are numerous VPN services available, configuring a VPN on your Raspberry Pi can provide an affordable and customizable solution. Here's a comprehensive guide on how to configure a VPN on your Raspberry Pi.
Choose the Right VPN Protocol: Before diving into the configuration process, decide which VPN protocol you want to use. OpenVPN is a popular choice due to its robust security features and flexibility.
Install OpenVPN: Start by updating your Raspberry Pi's software to ensure you have the latest packages. Then, install the OpenVPN software by running the appropriate commands in the terminal.
Set Up Configuration Files: Generate configuration files for your VPN server using the EasyRSA tool included with OpenVPN. These files contain the necessary cryptographic keys and settings for establishing a secure connection.
Configure OpenVPN Server: Once you have the configuration files, configure the OpenVPN server by editing the server configuration file. Customize settings such as port number, protocol, and encryption to suit your preferences.
Create Client Profiles: Generate client profiles for each device that will connect to the VPN. These profiles include the necessary configuration settings for establishing a secure connection.
Transfer Configuration Files: Transfer the server and client configuration files to their respective devices. Ensure that the files are securely transferred to prevent unauthorized access.
Start the VPN Server: Start the OpenVPN server on your Raspberry Pi using the systemctl command. Monitor the server logs to ensure everything is functioning correctly.
By following these steps, you can configure a VPN on your Raspberry Pi to enhance your online privacy and security. Whether you're browsing the web, accessing sensitive information, or connecting to public Wi-Fi networks, a VPN provides an added layer of protection for your data.
0 notes
Text
can you use a vpn on raspberry pi
🔒🌍✨ Get 3 Months FREE VPN - Secure & Private Internet Access Worldwide! Click Here ✨🌍🔒
can you use a vpn on raspberry pi
VPN installation on Raspberry Pi
Title: How to Install a VPN on Raspberry Pi: A Comprehensive Guide
In today's digital landscape, privacy and security have become paramount concerns for individuals and businesses alike. One effective solution to safeguard online activities is the use of Virtual Private Networks (VPNs). When it comes to setting up a VPN, Raspberry Pi—a versatile, low-cost, credit-card-sized computer—provides an excellent platform. Here's a step-by-step guide on how to install a VPN on Raspberry Pi:
Choose Your VPN Provider: Start by selecting a reputable VPN service provider that offers compatibility with Raspberry Pi. Ensure they support OpenVPN, one of the most widely used VPN protocols.
Prepare Your Raspberry Pi: Make sure your Raspberry Pi is up to date with the latest software updates. You'll also need to install Raspbian, the official operating system for Raspberry Pi, if you haven't already.
Install OpenVPN: Use the terminal to install the OpenVPN software on your Raspberry Pi. This can be done by running a few simple commands, which are typically provided by your VPN provider.
Configure OpenVPN: Once OpenVPN is installed, you'll need to configure it to connect to your VPN provider's servers. This involves downloading configuration files from your provider and placing them in the appropriate directory on your Raspberry Pi.
Authenticate Your VPN Connection: Depending on your VPN provider, you may need to enter your username and password to authenticate the connection. This information is typically provided by your VPN provider.
Test Your Connection: After configuring the VPN, it's essential to test your connection to ensure everything is working correctly. You can do this by attempting to connect to the internet while the VPN is active and verifying that your IP address is masked.
Automate the Connection (Optional): For convenience, you can set up your Raspberry Pi to automatically connect to the VPN at startup. This ensures that your privacy and security are always maintained without manual intervention.
By following these steps, you can easily set up a VPN on Raspberry Pi, providing a secure and private internet browsing experience for all your connected devices. Whether you're concerned about protecting sensitive data or simply want to browse the web anonymously, a VPN on Raspberry Pi is a valuable tool in today's digital age.
Compatible VPN clients for Raspberry Pi
Title: Exploring Compatible VPN Clients for Raspberry Pi
Raspberry Pi, the versatile single-board computer, has become a favorite among tech enthusiasts and DIYers for its myriad of applications. One popular use case is configuring it as a VPN gateway, providing secure and private internet access for connected devices. However, choosing the right VPN client software for your Raspberry Pi can be crucial for optimal performance and compatibility. Let's delve into some of the top options available:
OpenVPN: OpenVPN is a widely used open-source VPN solution known for its robust security features and flexibility. It's compatible with Raspberry Pi and offers excellent community support. Setting up OpenVPN on Raspberry Pi involves installing the OpenVPN software package and configuring it according to your VPN provider's specifications.
WireGuard: WireGuard is a modern VPN protocol known for its simplicity and performance. It's designed to be lightweight and efficient, making it suitable for resource-constrained devices like Raspberry Pi. Setting up WireGuard on Raspberry Pi is relatively straightforward, thanks to its user-friendly configuration.
PiVPN: PiVPN is a popular script that simplifies the installation and management of VPN services on Raspberry Pi. It supports both OpenVPN and WireGuard protocols, allowing users to choose the one that best fits their needs. PiVPN streamlines the setup process, making it ideal for beginners looking to deploy a VPN on Raspberry Pi quickly.
StrongSwan: StrongSwan is an open-source IPsec-based VPN solution suitable for Raspberry Pi. While it may require more advanced configuration compared to other options, StrongSwan offers robust security features and interoperability with various VPN protocols.
Before selecting a VPN client for your Raspberry Pi, consider factors such as security, performance, ease of configuration, and compatibility with your VPN provider. Additionally, ensure that your Raspberry Pi meets the hardware requirements for running the chosen VPN client effectively. With the right VPN client, you can enhance the privacy and security of your Raspberry Pi-powered projects and enjoy a safer browsing experience.
VPN configuration on Raspberry Pi
To set up a VPN on a Raspberry Pi, you can follow these steps:
Choose a VPN protocol: There are various VPN protocols to choose from, such as OpenVPN, PPTP, or L2TP. OpenVPN is commonly recommended for its security and versatility.
Install the necessary software: Depending on the VPN protocol you choose, you will need to install the appropriate software on your Raspberry Pi. For OpenVPN, you can use packages available in the default repositories.
Obtain VPN configuration files: You need to obtain configuration files from your VPN provider. These files contain the necessary information to connect to the VPN server.
Configure the VPN connection: You will need to edit the configuration files with your VPN provider's details, such as server IP, authentication credentials, and encryption settings.
Connect to the VPN: Once you have configured the VPN connection, you can start the VPN service on your Raspberry Pi and establish a secure connection to the VPN server.
Setting up a VPN on a Raspberry Pi can enhance your privacy and security, especially when accessing the internet on public networks. It allows you to encrypt your internet traffic and mask your IP address, giving you anonymity and protection against cyber threats. By following these steps, you can easily configure a VPN on your Raspberry Pi and enjoy a more secure online experience.
Benefits of using VPN on Raspberry Pi
Title: Unlocking the Power of Privacy: Benefits of Using VPN on Raspberry Pi
In an era where digital privacy is paramount, harnessing the capabilities of a Virtual Private Network (VPN) on Raspberry Pi opens a realm of advantages for users. The marriage of VPN technology with the versatile Raspberry Pi platform offers a multitude of benefits, ranging from enhanced security to unrestricted access to online content.
First and foremost, utilizing a VPN on Raspberry Pi fortifies online security. By encrypting internet traffic, VPNs shield sensitive data from prying eyes, safeguarding against potential cyber threats such as hacking and surveillance. Raspberry Pi's flexibility allows users to configure VPN settings to their preferences, ensuring a personalized and robust security setup.
Moreover, VPNs empower users to bypass geographic restrictions and censorship, granting access to a plethora of content worldwide. Whether it's streaming services, websites, or online games, Raspberry Pi coupled with a VPN unlocks a borderless internet experience, transcending regional limitations and promoting digital freedom.
Additionally, deploying a VPN on Raspberry Pi enhances anonymity and privacy. By masking IP addresses and obscuring online activities, users can browse the web with peace of mind, knowing their digital footprint remains concealed from advertisers, ISPs, and other third parties.
Furthermore, integrating a VPN with Raspberry Pi fosters privacy-conscious IoT (Internet of Things) projects. Whether controlling smart home devices or monitoring sensors, VPNs add an extra layer of security, ensuring data transmitted between devices remains confidential and protected from potential breaches.
In conclusion, the benefits of using a VPN on Raspberry Pi are abundant and far-reaching. From bolstering security and privacy to circumventing online restrictions, the combination of VPN technology with the Raspberry Pi platform empowers users with unparalleled control over their digital experiences. By harnessing these advantages, individuals can navigate the digital landscape with confidence and peace of mind.
VPN setup guide for Raspberry Pi
Title: Complete VPN Setup Guide for Raspberry Pi
In the digital age, ensuring your online privacy and security is paramount. One effective way to achieve this is by setting up a Virtual Private Network (VPN) on your Raspberry Pi. VPNs encrypt your internet connection, shielding your data from prying eyes and providing anonymity online. Setting up a VPN on a Raspberry Pi is a straightforward process, and this guide will walk you through it step by step.
1. Choose a VPN Protocol: Start by selecting a VPN protocol. OpenVPN is commonly used due to its robust security features and compatibility with various platforms, including Raspberry Pi.
2. Install Required Software: Begin by updating your Raspberry Pi's operating system: sudo apt-get update sudo apt-get upgrade
Then, install OpenVPN and EasyRSA: sudo apt-get install openvpn sudo apt-get install easy-rsa
3. Configure OpenVPN: Copy the OpenVPN configuration files to the appropriate directory: sudo cp /usr/share/doc/openvpn/examples/sample-config-files/server.conf.gz /etc/openvpn/ sudo gzip -d /etc/openvpn/server.conf.gz
4. Generate Certificates: Use EasyRSA to generate the necessary certificates and keys: cd /etc/openvpn/easy-rsa/ sudo ./easyrsa init-pki sudo ./easyrsa build-ca sudo ./easyrsa gen-req server sudo ./easyrsa sign-req server server sudo ./easyrsa gen-dh
5. Configure Firewall and Routing: Adjust firewall settings to allow VPN traffic: sudo iptables -t nat -A POSTROUTING -s 10.8.0.0/24 -o eth0 -j MASQUERADE sudo systemctl start openvpn@server sudo systemctl enable openvpn@server
6. Connect to Your VPN: Download the client configuration file from your Raspberry Pi and import it into your VPN client software on your device.
By following these steps, you can set up a VPN on your Raspberry Pi to enhance your online security and privacy. Enjoy safe and anonymous browsing!
0 notes
Text
can we make your own vpn
🔒🌍✨ Get 3 Months FREE VPN - Secure & Private Internet Access Worldwide! Click Here ✨🌍🔒
can we make your own vpn
DIY VPN setup
Title: How to Set Up Your Own VPN: A DIY Guide
In today's digital age, privacy and security are becoming increasingly important concerns. With the rise in online surveillance and data breaches, many internet users are turning to Virtual Private Networks (VPNs) to protect their online activities. While there are numerous VPN services available, setting up your own VPN can offer greater control and customization. In this guide, we'll walk you through the process of creating your own VPN.
Choose Your Platform: The first step in setting up your DIY VPN is selecting the platform on which you'll run it. Popular options include using a virtual private server (VPS) from a hosting provider or setting up a VPN on your home network using a spare computer or Raspberry Pi.
Install VPN Software: Once you've chosen your platform, the next step is to install VPN software. OpenVPN is a popular open-source option known for its security and flexibility. You can easily install OpenVPN on most operating systems, including Linux, Windows, and macOS.
Configure VPN Settings: After installing the VPN software, you'll need to configure the settings to suit your needs. This includes setting up encryption, choosing authentication methods, and configuring server locations.
Generate Certificates: VPNs use certificates to authenticate users and establish secure connections. You'll need to generate certificates for both the server and client devices using tools provided by the VPN software.
Connect Devices: Once your VPN server is up and running, you can connect your devices to it using the generated certificates and VPN client software. This allows you to encrypt your internet traffic and route it through your private network, keeping it safe from prying eyes.
By following these steps, you can create your own VPN and take control of your online privacy. Whether you're concerned about data security, censorship, or simply want to browse the web anonymously, setting up a DIY VPN can provide peace of mind and enhanced security for your online activities.
Personal VPN creation
A personal VPN, or Virtual Private Network, is a powerful tool that provides online privacy and security by creating a private network from a public internet connection. Creating your personal VPN allows you to encrypt your internet connection and protect your data from prying eyes, especially when using public Wi-Fi networks.
To create your personal VPN, you can utilize various methods, including setting up a VPN server at home, using VPN software, or configuring a VPN on a cloud service. Setting up a VPN server at home requires technical knowledge and the right hardware, such as a dedicated server or a compatible router. VPN software, on the other hand, offers an easier solution for creating a personal VPN, usually with a user-friendly interface for quick setup.
Configuring a VPN on a cloud service is another option for creating a personal VPN. Cloud-based VPN services offer ease of setup and maintenance, as well as scalability and flexibility in choosing server locations. This method is suitable for individuals looking for a cost-effective and hassle-free way to create their VPN.
Regardless of the method you choose, creating a personal VPN enhances your online security and privacy by masking your IP address and encrypting your internet traffic. It also allows you to bypass geo-blocks and access region-restricted content. With a personal VPN, you can browse the internet with peace of mind, knowing that your online activities are secure and private.
Self-hosted VPN solution
Title: Exploring the Benefits of Self-Hosted VPN Solutions
In today's digital landscape, online privacy and security have become increasingly paramount. With the rise of cyber threats and data breaches, individuals and businesses alike are seeking reliable methods to safeguard their sensitive information. One effective solution gaining momentum is the self-hosted VPN (Virtual Private Network).
A self-hosted VPN operates by allowing users to create their own private network, providing encrypted connections and routing their internet traffic through a secure server. Unlike traditional VPN services that rely on third-party providers, self-hosted VPNs offer users complete control over their data and infrastructure.
One of the key advantages of a self-hosted VPN is enhanced privacy. By hosting the VPN server yourself, you eliminate the need to trust third-party providers with your data. This reduces the risk of potential data breaches or unauthorized access, as you maintain full ownership and oversight of the server.
Additionally, self-hosted VPN solutions offer greater customization and flexibility. Users can tailor the configuration to meet their specific needs, such as implementing custom encryption protocols or integrating additional security features. This level of control allows for a more personalized and secure VPN experience.
Another benefit is improved performance and reliability. With a self-hosted VPN, users can optimize server resources and bandwidth allocation according to their requirements, ensuring consistent speeds and uptime. This is particularly advantageous for businesses and organizations with high data traffic or specific performance demands.
Moreover, self-hosted VPN solutions promote scalability and cost-effectiveness. As your needs evolve, you can easily scale the infrastructure to accommodate growing user bases or changing requirements without incurring significant additional expenses.
In conclusion, self-hosted VPN solutions offer a compelling alternative to traditional VPN services, providing users with enhanced privacy, customization, performance, and scalability. By taking control of your VPN infrastructure, you can bolster your online security and protect your sensitive data with confidence.
Homemade virtual private network
Title: Crafting Your Own Homemade Virtual Private Network (VPN)
In an age where online privacy and security are paramount, having a Virtual Private Network (VPN) has become essential for many internet users. However, relying on commercial VPN services might not always guarantee complete privacy or trustworthiness. That's where the concept of a homemade VPN comes into play, offering a customizable and potentially more secure solution.
A homemade VPN involves setting up your own private network using readily available tools and software. By doing so, you can have full control over your VPN's infrastructure, ensuring a higher level of privacy and security.
To create your homemade VPN, you'll need a few key components:
Server: You'll require a server to host your VPN. This could be a spare computer, a Raspberry Pi, or even a virtual private server (VPS) from a hosting provider.
VPN Software: There are various open-source VPN software options available, such as OpenVPN and WireGuard. These tools facilitate the creation and management of VPN connections.
Configuration: Setting up your VPN involves configuring the server and client software to establish a secure connection. This includes generating encryption keys, defining IP addresses, and configuring firewall rules.
Security Measures: Implementing additional security measures, such as firewall rules, intrusion detection systems (IDS), and regular software updates, is crucial to safeguard your homemade VPN against potential threats.
Benefits of a homemade VPN include:
Enhanced Privacy: By controlling the server infrastructure, you can minimize the risk of third-party involvement and data logging.
Customization: You have the flexibility to tailor the VPN configuration to your specific needs and preferences.
Cost Savings: Creating your own VPN can be more cost-effective in the long run compared to subscription-based services.
However, it's important to note that setting up a homemade VPN requires technical know-how and diligence in maintaining security measures. Additionally, ensure compliance with relevant laws and regulations regarding VPN usage in your jurisdiction.
In conclusion, a homemade VPN offers a viable alternative for those seeking greater control and customization over their online privacy and security. With the right tools and knowledge, anyone can establish their own secure private network.
Building your own VPN service
Building your own VPN service can offer numerous benefits, from enhanced online privacy and security to unrestricted access to geo-blocked content. While there are many VPN providers available, creating your own service gives you full control over security measures and ensures that your data remains private.
To begin, you'll need to choose a suitable server to host your VPN. This server should have adequate processing power and bandwidth to handle the VPN connections effectively. Popular choices include cloud-based services like Amazon Web Services (AWS) or DigitalOcean, or you could even repurpose an old computer to act as your server.
Next, you'll need to select VPN software to run on your server. OpenVPN is a popular choice due to its open-source nature and robust security features. Setting up OpenVPN involves configuring server settings, generating encryption keys, and creating user profiles for VPN access.
Once your server and software are in place, you'll need to configure your network settings to route traffic through the VPN server. This may involve adjusting firewall rules and network routing tables to ensure that all traffic is encrypted and securely transmitted through the VPN.
It's essential to implement strong security measures to protect your VPN service from potential threats. This includes regularly updating software, implementing multi-factor authentication for user access, and monitoring server logs for any suspicious activity.
Finally, you'll need to distribute client software to users who wish to connect to your VPN service. This software will allow them to securely connect to your VPN server and encrypt their internet traffic.
Building your own VPN service may require some technical expertise, but the benefits of enhanced privacy, security, and access to restricted content make it a worthwhile endeavor for many users. With careful planning and implementation, you can create a VPN service that meets your specific needs and preferences.
0 notes
Text
Raspberrypi a mini computer....worth for programming coding
#64 bit raspberry pi#how to get ip address of raspberry pi#how to raspbian#ip address scanner#rasbian os#raspberry pi 4#raspberrypi software installation
0 notes
Text
Renegotiate the web "bargain" by blocking all ads
Back in 2019, I wrote a case-study on ad- and tracker-blocking as part of EFF’s series on adversarial interoperability (AKA “competitive compatibility” or comcom). My point was that the ad-tech industry says that it tracks you as part of a bargain: you trade away your privacy and get media in exchange, but that this was a bizarre kind of take-it-or-leave-it form of bargaining.
https://www.eff.org/deeplinks/2019/07/adblocking-how-about-nah
The ad-tech deal boils down to this: “Just by following a link to this page, you have agreed to, well, anything we feel like doing. We can collect your data, sell it, merge it with other data, share it, mine it, exploit it. Forever.”
That’s not much of a bargain. Clearly the ad-tech companies don’t take it very seriously — as Facebook’s own privacy engineers have admitted in a leaked memo, they have no idea how they’re using your data (an FB engineer called the company’s data-handling “a complete shitshow”), so how can this possibly be a fair trade?
https://www.vice.com/en/article/akvmke/facebook-doesnt-know-what-it-does-with-your-data-or-where-it-goes
I’m no free market stan, but I do think that bargaining can improve outcomes. That’s where ad-block comes in: by blocking ads (or trackers, say, with EFF’s Privacy Badger), the website makes an offer: “Give me everything,” and you make a counter-offer: “How about ‘Nah?’”
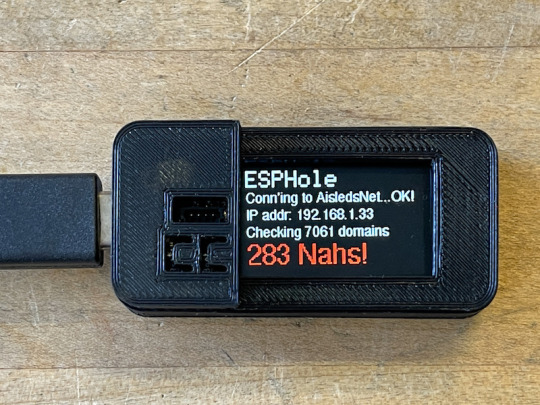
A couple weeks ago, the folks at Adafruit got in touch to tell me about a new privacy kit they were developing: the ESPHole, a variant on the PiHole privacy appliance. This is a matchbox-sized gadget based on the open source Raspberry Pi processor. You get it onto your home wifi and then tell all your devices to use it as their DNS server. It has a list of known ad servers and when your computer tries to contact one of these servers (to fetch an ad embedded in a web-page or app), it sends back 0.0.0.0 as the IP address. Your computer is unable to reach the ad server, so you don’t see the ads — and the ad-tech company doesn’t get to harvest your data.
I sent them my EFF case-study and they thought it was a great fit, so they programmed their ESPHole to count blocked ads a “Nah”s — so the screen will tell you “283 Nahs!” after blocking 283 ads.
https://learn.adafruit.com/esphole-ad-blocker?view=all
Back in 2015, Doc Searls called ad-blocking “the biggest consumer boycott in history.” The industry claims it harvests and processes our data with our consent. Gadgets like the ESPHole let you withdraw that consent, and make it stick. It lets you say, “How about ‘Nah?’”
https://web.archive.org/web/20180923223849/http://blogs-test.harvard.edu/doc/2015/09/28/beyond-ad-blocking-the-biggest-boycott-in-human-history/
In the early days of the browser, the web was taken over by an epidemic of obnoxious pop-up ads. They would spawn in invisible windows, or play sound, or run away from your cursor. Closing one would make three more pop up. We killed pop-ups once Mozilla and Opera shipped a browser with pop-up blocking turned on by default. All the arguments about whether pop-ups were good or bad for publishers or users were trumped by a technological fact: no one sees pop-up ads anymore. Once that fact was true, pop-ups disappeared for good.
America desperately needs a federal privacy law with a private right of action, and the EU desperately needs to start actually enforcing the GDPR. But as important as these laws are, the technology has a role to play here. Stopping tracking in your browser, or across your whole home network, will make it much easier to get good laws passed and enforced. After all, if no one sees invasive ads, the companies won’t have any money to mobilize to block privacy laws.
The ESPHole is $25, plus another $5 for a USB cable if you don’t already have one. I don’t have any commercial interest in Adafruit or the ESPHole — but I am proud as anything to have played a small role in inspiring this great little gadget.
[Image ID: An Adafruit ESPHole: an open-source hardware gadget the size of a matchbox with a small screen that reads 'ESPHole/Conn'ing to Aisleds.Net...OK!/IP addr: 192.168.1.33/Checking 7061 domains/283 Nahs!]
3K notes
·
View notes
Text
See blocked YouTube videos: 4 ways
The popular video platform YouTube provides a wealth of videos and clips on various topics - but unfortunately still not completely everywhere and for everyone. Bans affect YouTube videos for a variety of reasons. For example, content can be “reserved” for users in a certain region through geo-blocking, but access to YouTube as a whole can also be impossible in countries with very restrictive governments. The question “How can you watch videos that are blocked on YouTube?” Is therefore of interest to users all over the world. It can be answered using various methods - we will introduce you to the best of them!
№1 Bypass YouTube block via VPN - the easiest way The easiest way to watch blocked videos on YouTube is without a doubt a VPN client. The virtual private networks direct you through one of their servers, the location of which you can choose. If a YouTube video is blocked in Germany , but visible in the USA , you simply choose a VPN server located in the United States. Good VPNs have numerous other advantages, such as anonymizing your data and hiding your IP address , and they don't cost much in the premium package.
In order to be able to watch content blocked on YouTube with a VPN of your choice, you need to take out a subscription and install the VPN client. You also need a user account with the VPN service that you use to log in after installation. This is how the VPN recognizes your status and your subscription.
Once logged in, you can now configure the software or app, but in most cases you can also use the VPN with automated settings - in this case the software will search for the next available server. The VPN connection can usually be established with just one click - alternatively, you can choose a server location that you need to be able to access blocked videos.
We've rounded up the top performing VPNs :
CyberGhost CyberGhost is also suitable for bypassing the blocks on YouTube videos. The Romanian VPN provider is popular because of its uncomplicated installation and operation, scores with around 6,000 servers and can be switched on with one click. If you not only use YouTube, but also streaming platforms, you can benefit from particularly good bandwidth via special servers.
CyberGhost is also compatible with all common operating systems and even runs on Raspberry Pi and Chrome as well as numerous routers. You can test CyberGhost completely free of charge. This VPN currently offers discounts as a subscription, and you can also have CyberGhost for 2.50 euros per month.
ExpressVPN ExpressVPN is one of the fastest providers, the service runs on a total of 3000 high-speed servers in over 150 international locations. With ExpressVPN, you can break almost any YouTube block. The VPN is not only very fast, but also extremely compatible - it runs on many game consoles, Blackberry devices and Raspberry Pi.
Of course, this high quality also costs something - if you want to use the super-fast VPN, you have to dig a little deeper into your pocket with around 8 euros per month in an annual subscription than with other VPNs, but you really get a lot on offer.
PIA VPN PIA is the abbreviation for Private Internet Access. The American VPN provider can score points with more than 2,600 servers in almost 50 countries worldwide. Thanks to the unlimited bandwidth, video playback with PIA is no problem. The VPN client is compatible with the common operating systems Microsoft Windows, Mac OS and Linux, but can also be used with extensions in many browsers such as Chrome and Firefox and as apps for the Android smartphone and iOS on the iPhone.
With PIA you can watch videos that are blocked on YouTube Germany, but you can also bypass country blocks for YouTube videos and music videos elsewhere - and that also for streaming offers. The VPN costs you with a subscription for two years only around 2.50 euros per month. And you can even pay for them with gift coupons from Walmart or Starbucks, for example, and thus remain completely anonymous.
VeePN VeePN is a new addition to the scene, but already has a large network of servers and convinces with high-quality encryption. VeePN can also be proud of its intuitive usability. The provider shows its strong side in circumventing geoblocking, so you can watch blocked YouTube videos in Germany as well as use numerous foreign locations for YouTube and streaming.
You can watch blocked videos on YouTube using Chrome with an extension or watch blocked YouTube videos with the Firefox add-on. VeePN costs only around 1.50 euros per month with a long-term subscription, making it one of the cheapest providers!
VPN provider comparison №2 use proxy website to unblock YouTube Proxy websites work a bit like a VPN - here too you will be redirected via the page and can watch the blocked YouTube videos. Proxies such as ProxTube or ProxFlow are known. However, the proxies do not hide your data or your IP address, so your activities remain visible to the ISP or the administrator in the company or school network!
№3 use browser extensions to watch YouTube Instead of always having to navigate through a proxy page, you can also use add-ons in the browser. These add-ons and plugins are available for applications such as ProxTube or Ultrasurf. They make it possible to configure a proxy server that is basically controlled. With ProxTube you can watch blocked YouTube videos on Firefox, but Chrome needs a plug-in for ProxFlow.
Use №4 Tor to watch blocked YouTube videos You can also unblock a video on YouTube with the anonymous Internet browser Tor. The browser can be downloaded and installed from the torproject.org website . The very secure browser not only gives you access to YouTube content, but also reliably hides your online activities through the redirects in the Tor network. The browser is used for online security, data protection and unrestricted data traffic, among others by users and activists in restrictive countries such as North Korea, China or Turkey.
https://christoph-leydolt.medium.com/3-reasons-to-get-a-vpn-valid-ones-p-1-3154c3da0104
1 note
·
View note
Text
How to reset your router?
Did you know you have far more than a single IP address? The personal computer systems that we use have a public IP address assigned to us by our Internet Service Provider (ISP), which must be distinctive across the complete internet. Our router has a private IP address, allowed only on private networks. This IP require not be globally special because it is not a direct access address, i.e. no one could access the IP address 192.168.1.1 outdoors of a private network.
When you want to attain a location in the real planet, you ask for its address and put it in your GPS. When you want to reach a location on the world wide web, you also ask for its address, and you sort it into the URL bar of your favorite net browser. Some new Routers have auto setup mode. They permit customers to configure it but if the user doesn't want to Setup a new Router then they automatically setup it for the user. They locate Default Router Login IP address and Password for you.
A public IP address is the IP address assigned to devices that are connected to the net. This address is assigned by your ISP and no other program on the web can have the same address. When you connect to the web, you grow to be portion of a much bigger network that any individual can connect to. Your public IP is usually visible unless you choose to hide it with a VPN service.
Also, verify the documentation for the default administrative ID and password. After you reset a router, it reverts back to the default ID and password. So it is a great thought to log in and alter the administrative password to one thing other than the default. Following getting into the right admin username and password, you ought to be taken straight to the admin panel, exactly where you need to be in a position to modify all the settings you see there.
If the IP address 192.168.1.11 is not your router IP you can retrieve the router IP with the Ipconfig command (only Windows, for Mac & Linux use ifconfig). 192.168.1.11 is an IP address in the variety 192.168.1.1 - 192.168.1.255. A quite typical default IP address for a router or a modem is 192.168.0.1 — you kind this in a browser and you happen to be accessing the router's or modem's interface to make the adjustments you need.
After profitable login, you can go to Wireless Settings and alter the router settings according to your ease. Router Admin Alter Password. You are almost certainly reading this post because you happen to be experiencing troubles with your router and can not connect to the web. If that is the case, you want to access the router's admin panel employing the 192.168..254 IP address and verify that it is set up correctly and does not display any error messages.
Try to reconnect to Wi-Fi on a computer or mobile device. If the connection is effective, your home network has been reset. Hold in thoughts that resetting your router to its factory settings will erase all prior configuration, such as your Wi-Fi network and its password. Netgear Router has a default IP address with 192.168.0.1. All you need to do is connect Router and Pc with a cable. A popup box will seem, exactly where you have to type the username and password supplied to you.
The extremely initial point you ought to be aware of is that apart from the IP address, there's a new sort of identification recognized as the port number. If you want to appear at the IP address of your router, you should do some essential actions. Also, be certain you will use the IP address, which you just identified on the step ahead of. What you have to know is the native IP address of your Raspberry Pi.
Locate your router's "Reset" button. You are going to typically discover this button, which is fairly small, on the back of the router. If you do not know the right administrator login name and administrator password, you ought to flip your router around and appear for a sticker on the bottom side. It really is extremely widespread for router companies to print the default administrator login name and administrator password on a sticker, along with other valuable data, such as the name of the router or the internet site of the manufacturer.
Ok, the output of the ipconfig although attached to nothing at all but the router (and it isolated) show's APIPA addressing which means you're not getting something from DHCP on the router. Given that the PC's network interface is DHCP enabled, that implies your router has to have it really is DHCP service shut off. Turn on your router and connect it to your personal computer with an Ethernet cable. If the private network wants to connect to the net, is should use a proxy server or gateway.
Why? Because 192.168.0.1 is utilized in a private IPv4 network address as the router gateway. While other IP addresses could be utilized as properly, as you can see above, 192.168.0.1 is by far the most frequent default router IP address. All routers are accessible through the browser. If your routers IP address is 192.168.1.11, sort in your browser. You will see a login page. Most commonly utilized usernames and passwords are: "admin", "1234" or "none". Please refer to your route documentation.
All IP addresses are utilized to recognize devices on a pc network, and 192.168.0.1 is no exception. Nevertheless, this IP address is utilised to identify devices connected to a unique sort of computer network named private network. Already attempted the reset button, other browsers (IE and firefox, do not find the 192.168.1.1 web page at all), already attempted factory reset button. You do not constantly need to know the IP address of your modem or router. You only need to have it when setting up a new modem or wireless router , altering settings or troubleshooting a network dilemma.
Verify the Manual how the reset button works. Usually you need to have to hold the reset button for an extended period of time to restore to factory settings. The worth for IPv4 is your private IP address. Step 3: Open Browser and variety 192.168.1.1 and press Enter. Turn on your router and connect it to your laptop with an Ethernet cable. Some routers permit you to connect to them wirelessly, but Linksys routers have this function disabled by default for safety reasons.
The 192.168.0.1.1 is not a valid IP address. It must be 192.168.0.1, which is a private IP address utilised by many routers to recognize themselves on pc networks. By visiting this IP address, you can access the internet interface of the corresponding router and modify its settings. Private IP addresses such as 192.168.0.1 are not accessible from the net, which tends to make them inherently a lot more secure compared with public IP addresses.
192.168.1.1 is an IP address in a private IP address variety that begins with 192.168.. and ends at 192.168.255.255. There are numerous other possibilities you will discover in your Routers like Change Mac Address, Alter Router Login IP and Password, and Block sites. 192.168.1.x to 192.168.1.54 is a private IP address list allocated to networking devices. For much more router passwords, we recommend you go to Default Router Password List , the internet's biggest and most updated default router passwords database.
1 note
·
View note
Text
192.168.1.1 Admin Login
192.168.1.1 is a Private IP Address for use only inside of a Private Network. Step 3. Click the Network & Internet” alternative. Step 5. Select how you are connected to your router. If you are hardwired to your router choose Ethernet. If you are connected to your router through WiFi choose Wi-Fi. Please post back here with the final results of the test and the information on exactly where your Computer network cable connects. But in most cases, the default IP Address for Modems and Routers is 192.168.0.1. Now you also require to Enter Default username and password in order to access its admin web page. The default username and password are distinct for a diverse manufacturer. Here we are going to share all the attainable Default Username and Password for 192.168.01 IP address.
Step three: Open Internet browser. Type or > Enter. To discover your router's public IP address, you need to dig around in the administrative console of your router. It is a private IP Address and can be accessed via a single device only at a time to stay away from any conflict between the devices. As opposed to Public IP Address, which is the very same for distinct devices connected to the exact same network, Private IP Addresses such as 192.168.1.1 cannot be very same on various devices.
Let us describe 1 common situation to you: You ultimately get back home following a long day at school or operate, and all you want to do is kick back and relax on the web. But the moment you fire up your internet browser you find out that you can't access the web simply because something is wrong with your router. The resolution? Use the 192.168..254 IP address to access the router's admin interface and repair the dilemma there.
Unlike us, a computer or smartphone can effortlessly uncover the default IP address of your modem or wireless router and then connect to it. You are inside the admin panel and can modify any settings now. Unplug the router, wait a handful of minutes, and then plug it back in. Wait till all the lights on the front of the router have turned on or are blinking ahead of trying to connect once again. Some routers occasionally need a restart after a power outage, due to improper startup even though the ISP's own equipment was down.
In order to access the router's net-based setup page, you'll need to have the router IP address. If you forgot that address, you will not be able to access the configuration page. But don't be concerned, simply because discovering the router IP address is not complex at all. If you forgot your username and password you can adhere to these directions to recover them. If you haven't changed the default user and password that comes with the router you can seek the advice of our router default usernames and passwords you are in the router's admin panel you are going to be in a position to modify and change all net settings.
The extremely very first point you ought to be aware of is that apart from the IP address, there's a new sort of identification recognized as the port quantity. If you want to look at the IP address of your router, you ought to do some essential actions. Also, be sure you will use the IP address, which you just discovered on the step prior to. What you have to know is the native IP address of your Raspberry Pi.
You cannot log in to the router unless you know the username and password. In this case, you can either check the model or get in touch with your Web Service Provider for the login particulars. Provided that you have been capable to log in, you need to now have full access to the router's web interface. 192.168.1. is a private IP address employed by numerous broadband routers to recognize themselves to other devices on the identical network. This IP address is not special, any several routers can share it with out any problems.
Sadly, most customers never even know how to log into router let alone how to modify the default router password to some thing far more safe. As told, the ip 192.168.1.11 is part of a private class C network The variety of this network is 192.168.. - 192.168.255.255. This make the number of possible IP addresses 65,535. This range is generally used on private networks since many routers are configured with 192.168.0.1 or 192.168.1.1 as their default address.
The 192.168..254 IP address belongs to the 192.168.0.1-192.168..255 variety of private IP addresses, which are commonly used for neighborhood region networks (LANs) and had been initially defined in an effort to delay IPv4 address exhaustion, which has been anticipated for decades now due to the dramatic development of the number of web-connected devices. You will see the default IP address of your modem or router from the Default Gateway section.
The excellent news is that the default login name and password are typically admin.” If that doesn't function, we suggest you Google something like default login name and password” followed by your router's model and manufacturer. For the 1st connection it is essential to use an RJ-45 cable connecting the laptop and the router, to configure it! The subsequent step is to enter your credentials for the web interface (login and password). These default password and login are specified in the manufaturer's documentation.
1 note
·
View note
Text
Something that is more techy that you can do to stop trackers is host your own DNS server set up with Pi-hole.
What's a DNS server? It's a server that every internet device you use must use to know how to connect to a website. When you type Tumblr.com your computer or phone doesn't actually know how to connect, so it asks the DNS server for the ip address.
Setting up your modem to use a raspberry pi with Pi-hole as your local DNS server allows you to blacklist ad domains. So when you load a website the raspberry pi will tell your phone the ip address of the Washington post but it'll not acknowledge how to connect to the ad. So since your device doesn't know where to go to download the ad it simply doesn't.
This is different from a browser add on in that it works across all your devices on your network. Your roku can't load some ads (though most still get through), your friend who visits and connects to your wifi will not get ads while there, those free apps that have ads simply can't connect to the ad server and won't display them.
Raspberry Pi's are sold out nearly everywhere now, but a Pi Zero ($15) will work just fine for most people. I have one in my home and on average 60% of DNS requests are for ads and are blocked. More than HALF of the time my devices connect to something is an attempt load an ad. >:(

135K notes
·
View notes
Text
Security Project Proposal
Introduction
For me, computer science isn’t by itself alluring; it’s what can be done with computers that’s truly fascinating.
So, one particular idea of technology that interests me is the concept of the digital footprint. Wikipedia defines one’s digital footprint as ‘one’s unique set of traceable digital activities, actions, contributions and communications manifested on the Internet or on digital devices’.
To take it out of the domain of technology for a second, intelligence organisations have spent many hours and resources developing techniques to gather information about a target’s movements and actions. They did this because they understood the absolute value of this information – said information can aluminate bigger ideas.
In the current age, collecting one’s digital footprint is a new said technique.
To bring it into the tangible world, commercial businesses can offer free wifi to consumers visiting a particular retail store in exchange for the permission to track their movements in and out of the store (agreeing to ‘location tracking’). This can be done because the MAC address of device is unique, and therefore can be used to identify the owner. Whenever the device enters the store, it will automatically seek to reconnect – once reconnected, the MAC address is collected, and the individual is identified and their movement is recorded.
But wait, I lied. This doesn’t just track one’s movements in and out of one retail store. Instead, it tracks their movements in and out of all retail stores that have said free wifi installed (belonging to a particular ‘digital net’). In fact, if a third-party company owns all the wifis, then this tracking isn’t just restricted to one particular company, but to all companies that contribute to the digital net, and why wouldn’t they if they get such an insight into their customer’s behaviour in return?
The following article goes into more detail and provides real-life examples if interested: link.
So, to start my journey in discovering this field of technology, I want to start investigating how you can collect one’s digital footprint using wifi or Bluetooth signals sent from personal devices.
Goal
To accumulate the digital footprint of anonymous individuals accessing the sec-lab in K17 by listening to public wifi or Bluetooth signals sent from their personal devices, and hence, build a unique profile of said anonymous individuals, providing a small insight into their day to day lives.
Skills
I am going to have to have an understanding of what public wifi or Bluetooth signals are sent from particular devices. I’d like to note that I understand that by wifi’s very nature, all wifi signals are public – I only stress to say ‘public’ wifi to infer that I’m merely collecting what is already there.
Besides from passively collecting packets, it might be worth investigating whether there are particular techniques for inciting transmissions from devices for those devices that are, for any reason, ‘shy’.
I’ll also need to be able to work with a raspberry pi, as this will act as the device that will be collecting said data. This data will then need to be organised into a useful manner, building profiles of devices, and thereby, collecting an individual’s digital footprint. It is important to note that I’ll have to keep in mind that people have multiple devices, so maybe identifying how many and what devices each person has would be a real life example of being able to gain insights into an individual’s consumer habits.
Ambitiously, I would love to extend the digital net to two or more locations and have this information public available on a website – individual’s can look up their past movements using their MAC addresses and potentially learn something about digital footprints.
The Process
The first step is to use a USB wifi adaptor and Wireshark to start analysing packets being sent from my personal devices – I’d be focusing mainly on wifi and potentially Bluetooth signals, though I should keep an eye for cellular signals too. With that information, I aim to build an understanding of what packets I can be looking for when I’m trying to collect one’s digital footprint.
I’ll be going into this tasking knowing a few things: devices can and do automatically connect to known wifis, the device has to be assigned an IP from the modem within the wifi network (eg. 10.xx.xx…) and finally, that ARP and DHCP are important protocols to know.
Ultimately, I’ll be reverse engineering packets to gain an understanding of what kind of packets are being sent from these devices – I’ll have to keep in mind that signals from different types of devices made from different companies may differ.
So assuming I can now collect packets with easy, I then have to see if I can use information within this packets to uniquely identify devices (probably the MAC address will do).
Once I have an understanding of what I am looking for, I then have to program a raspberry pi to be listening for all packets (does it even have the firepower to do that?) and filter for the important packets, scraping data from them.
As mentioned above, this scraping cannot be restricted to one type of device from one company – all major devices must be trackable.
If there aren’t enough important packets being collected, or I have time, I’ll have to investigate whether you can encourage devices to send said packets – what if a device is already connected to the UNSW wifi? Will that restrict my ability to track the device? (I do know you can force devices to disconnect from a wifi, would be interesting to test on my own devices, but not on others).
Organise the collected data in a useful way, providing valuable information in the comings and goings of devices.
Try and pair devices together that are owned by the same person if possible.
Store data into a database, and host a public website, advertising said information to students.
Expand to more rooms.
Marking Criteria
Credit: Complete task 1 to a satisfactory level.
Distinction: Complete task 2 and 3
High Distinction: Complete task 4 and 5
Kudos and the strengthening of the case for a software project next sem: Task 6 and 7
2 notes
·
View notes
Text
How I Corebooted my thinkpad x220t
Note: I ordered my SOIC8 test clip from China, but it never came and so this guide is a theoretical write up of how I would’ve done this had it arrived. This was very unfortunate as I had everything else prepared.
This is a guide on how to coreboot a thinkpad x220t. Most thinkpads are pretty similar so this guide can also be used for an x200-x230, though you should still google for any model specific details.
Also backup your BIOS for the love of god, and don’t panic if you brick it, just reflash with your backup. And be careful not to fry the flash chip, if you do, you might be able to desolder and replace it.
This guide comes with no warranty, proceed at your own risk.
What you need
x220t
Raspberry Pi 3B
A linux computer to SSH into the Pi
Female jumper leads (to connect the Pi and the test clip)
SOIC 8 pin test clip (like this)
Procedure
Download and flash Raspbian Lite to a micro SD card.
Make a file called ssh in the root directory (to enable SSH)
Follow the directions here to set up wifi on the Pi so you can access it remotely (you can use a wired connection if you want)
Use nmap or check your router to find the ip address of the Pi
SSH into the pi (default user and pw is pi and raspberry)
Prepare the Pi for flashing by updating it and installing everything with the following commands
sudo apt-get update && sudo apt-get dist-upgrade && sudo reboot
sudo apt-get update && sudo apt-get install libftdi1 libftdi-dev libusb-dev libpci-dev subversion
sudo apt-get install build-essential pciutils usbutils libpci-dev libusb-dev libftdi1 libftdi-dev zlib1g-dev subversion
svn co svn://flashrom.org/flashrom/trunk flashrom
cd flashrom/
make
sudo make install
Use the following commands to add the SPI kernal modules to /etc/modules so they persist between boots.
sudo modprobe spi_bcm2835
sudo modprobe spidev
Shutdown the Pi, unplug the x220t and remove the batteries.
Remove the palmrest and keyboard from the x220t (consult the hardware maintenance manual for instructions on how to) and expose the flash chip (see image 1 in the appendix)
Hook up the test clip to the Pi (see image 2 in the appendix for a wiring diagram)
Connect the clip to the motherboard then turn the Pi on
Read the contents of the flash chip with the following command (do this several times and make sure the hash matches
sudo flashrom -p linux_spi:dev=/dev/spidev0.0 -r read01.bin
Download coreboot and use the ifdtool to extract whats need from the stock rom
git clone http://review.coreboot.org/coreboot.git ~/coreboot
cd ~/coreboot
git submodule update --init --recursive
cd ~/coreboot/util/ifdtool
make
sudo make install
cd ~
ifdtool -x ~/flash01.bin
mkdir -p ~/coreboot/3rdparty/blobs/mainboard/lenovo/x220
cd ~/coreboot/3rdparty/blobs/mainboard/lenovo/x220
mv ~/flashregion_0_flashdescriptor.bin descriptor.bin
mv ~/flashregion_2_intel_me.bin me.bin
mv ~/flashregion_3_gbe.bin gbe.bin
Use me_cleaner to neutralize the Intel ME
git clone https://github.com/corna/me_cleaner ~/me_cleaner
sudo apt-get install python3
./me_cleaner.py ~/coreboot/3rdparty/blobs/mainboard/lenovo/x220/me.bin
Configure coreboot
cd ~/coreboot
make nconfig
Build coreboot
make crossgcc-i386 CPUS=4 -b
make iasl
make
Flash coreboot
sudo flashrom -p linux_spi:dev=/dev/spidev0.0 -w ~/coreboot/build/coreboot.rom -c flashChipModel
Disconnect the clip and power up the laptop, it should boot to SeaBIOS
Appendix
image 1 - Flash chip on the motherboard
image 2 - Wiring diagram for the Pi
References
https://github.com/grisu48/Coreboot/tree/master/x220t
https://karlcordes.com/coreboot-x220/
https://tylercipriani.com/blog/2016/11/13/coreboot-on-the-thinkpad-x220-with-a-raspberry-pi/
https://wej.k.vu/coreboot/coreboot_on_the_lenovo_thinkpad_x220/
https://github.com/thetarkus/x220-coreboot-guide
1 note
·
View note
Text
10 Signs You Made A Great Impact On Best Vpn 2019
If you're searching for the best VPN for torrenting, personal privacy, bypassing censorship, staying anonymous online, navigating geographic constraints, or just area shifting, you have actually got a great deal of confusing choices. Keep reading as we help you choose the best VPN for you. VPNs, or Virtual Private Networks, are a fast and simple solution to making your computer system seem originating from a different location. They achieve this by producing a virtual network that routes all of your PC or smart device's network traffic through an encrypted tunnel and out the other side, making it appear to the world that you're really in whatever location the VPN server is located. This can help you bypass geographical limitations, prevent censors, or keep you (relatively) anonymous online. The problem is that there are scores of different VPN service providers out there, and a lots of various factors to utilize one-- so which one do you choose? Do Not Seem Like Reading Whatever? Here's the TL; DR Variation This post has a great deal of information, and you probably just wish to set up a VPN so you can try to watch your preferred TELEVISION program or film on a streaming service on the other side of the world that's unfairly been geographically limited, or you're trying to find something that can protect you while you're torrenting. So here are our top options and why we selected them: ExpressVPN is our leading option if you're trying to find easy, easy-to-use clients for each Windows, Mac, Android, iPhone, or Linux, blazing fast speeds that can handle torrenting or bypassing geographic limitations, and simply a typically enjoyable experience. They have an one month money-back warranty also. StrongVPN is an excellent option if you're trying to find blazing quick speeds, and a VPN that can manage torrenting and bypassing geographic restrictions. The customers are a little out-of-date in contrast, but since it's a lesser known service it in some cases is less likely to be blocked. They have a 30-day money-back assurance. Tunnelbear is a solid option if you're looking for a quick VPN connection to utilize at the coffeehouse-- they have a minimal complimentary trial tier and inexpensive rates, and while they aren't quite as powerful or fast, they have a truly nice service. Once again, if you're trying to find a VPN to bypass restrictions, check out among the services above. They've all got inexpensive costs and an one month money-back warranty, so you've got absolutely nothing to lose. What Is Virtual Private Networking, and Why Do People Utilize It? Through making use of software (and in some cases, at the corporate and governmental level, hardware) a VPN creates a virtualized network in between 2 physically separate networks. VPN use, for instance, enables an IBM employee to work from house in a Chicago suburban area while accessing the company intranet situated in a building in New york city City, as if he was right there on the New York office's network. The same technology can be utilized by customers to bridge their phones and laptops to their home network so, while on the roadway, they can safely access files from their home computers. RELATED: What Is a VPN, and Why Would I Required One? VPNs have other uses cases, however. Since they encrypt your connection, VPNs enable users to avoid others from seeing the data they're transferring. This keeps data secure, especially on public Wi-Fi networks in places like coffee bar and airports, making sure no one can snoop your traffic and steal your passwords or charge card numbers. Given that VPNs route your traffic through another network, you can also make it appear as if it's originating from another area. That indicates if you remain in Sydney, Australia, you can make your traffic appear to come from New York City. This is useful for particular websites that obstruct material based on your location (like Netflix). It likewise enables some individuals (we're taking a look at you, Australians) have to deal with insanely high import taxes on software application that see them paying two times (or more) what US consumers spend for the very same items. On a more serious note, a regrettably a great deal of individuals live in nations with high levels of obvious censorship and monitoring (like China) and countries with more concealed monitoring (like the US); among the best ways to get around censorship and tracking is to utilize a safe and secure tunnel to appear as if you're from elsewhere completely. In addition to concealing your online activity from a sleuthing federal government it's also beneficial for concealing your activity from a sleuthing Internet Service Provider (ISP). If your ISP likes to throttle your connection based on material (tanking your file downloads and/or streaming video speeds in the process) a VPN completely eliminates that issue as all your traffic is taking a trip to a single point through the encrypted tunnel and your ISP stays ignorant of what type of traffic it is. Simply put, a VPN is useful anytime you wish to either hide your traffic from people on your local network (like that complimentary coffee bar Wi-Fi), your ISP, or your government, and it's also extremely helpful to deceive services into believing you're ideal next door when you're an ocean away. Assessing Your VPN Needs Every user is going to have somewhat different VPN needs, and the very best method to choose the perfect VPN service is to take mindful stock of what your requirements are prior to you shop. You may even discover you do not require to go shopping due to the fact that home-grown or router-based services you already have are an ideal fit. Let's run through a series of concerns you need to ask yourself and highlight how different VPN features meet the requirements highlighted by those concerns. To be clear, a lot of the following concerns can be pleased on several levels by a single supplier, but the concerns are framed to get you thinking about what is most important for your personal usage. Do You Need Secure Access to Your Home Network? If the only use case you care about is firmly accessing your house network to, then you absolutely do not need to invest in a VPN company. This isn't even a case of the tool being overkill for the job; it's a case of the tool being wrong for the job. A remote VPN company provides you safe access to a remote network (like an exit node in Amsterdam), not access to your own network. To access your own home network, you desire a VPN server running on either your house router or an attached device (like a Raspberry Pi or even an always-on home computer). Ideally, you'll run the VPN server at the router level for finest security and very little power consumption. To that end, we recommend either flashing your router to DD-WRT (which supports both VPN server and client mode) or purchasing a router that has an integrated in VPN server (like the formerly reviewed Netgear Nighthawk and Nighthawk X6 routers). If this is the option you need (or even if you just want to run it in parallel with remote options for other jobs), certainly have a look at our post How to Set Up Your Own House VPN Server for extra details. Do You Required Secure Casual Surfing? Even if you aren't especially security or privacy conscious, everyone needs to have a VPN if they frequently utilize public Wi-Fi networks. When you use Wi-Fi at the cafe, the airport, or the hotel you're remaining at while taking a trip cross-country, you have zero idea whether or not the connection you're utilizing is secure. The router might be running outdated and jeopardized firmware. The router might actually be malicious and actively sniffing packages and logging your data. The router could be poorly configured and other users on the network could be sniffing your data or penetrating your laptop or mobile device. You never ever have any guarantee whatsoever that an unknown Wi-Fi hotspot isn't, either through malice or poor setup, exposing your data. (A password doesn't suggest a network is safe, either-- even if you need to get in a password, you could be based on any of these problems.). In such circumstances, you don't require a beastly VPN provider with huge bandwidth to secure your e-mail, Facebook, and web browsing activities. In truth, the very same house VPN server design we highlighted in the previous section will serve you simply as well as a paid options. The only time you may think about a paid solution is if you have high-bandwidth requirements that your house connection can't keep up with (like seeing big volumes of streaming video through your VPN connection). Do You Required to Geo-Shift Your Place? If your goal is to look like if you remain in another nation so you can access content only available in that are (e.g. BBC Olympic protection when you're not in the UK) then you'll need a VPN service with servers located in the geographical area you wish to leave the virtualized network in. Need UK gain access to for that Olympic protection your long for? Make sure your service provider has UK servers. Need a United States IP address so you can see YouTube videos in peace? Pick a provider with a long list of United States exit nodes. Even the greatest VPN company around is worthless if you can't access an IP address in the geographic area you need. Do You Required Privacy and Possible Deniability? If your requirements are more serious than enjoying Netflix or keeping some war kiddie at the coffee shop from snooping on your social networks activity, a VPN may not be for you. Lots of VPNs promise privacy, but couple of can actually provide it-- and you're still relying on the VPN supplier with access to your traffic, which isn't perfect. For that, you likely want something more like Tor, which-- while not ideal-- is a better anonymity option than VPNs. Lots of users do, however, count on VPNs to create some plausible deniability when doing things like file sharing on BitTorrent. By making their traffic look like if it's originating from a different IP address, they can put one more brick on the wall obscuring them from others in the swarm. Again, it isn't perfect, however it is useful. If that sounds like you, you desire a VPN company that does not keep logs and has a very large user base. The larger the service, the more individuals poring through every exit node and the harder it is to isolate a single user from the crowd. A great deal of individuals avoid utilizing VPN providers based out of the United States on the facility that US law would force those suppliers to log all VPN activity. Counterintuitively, there are no such data logging requirements for US-based VPN suppliers. They may be forced under another set of laws to turn over data if they have any to turn over, but there is no requirement they even keep the information in the very first location. In addition to logging concerns, an even larger issue is the type of VPN procedure and encryption they utilize (as it's far more probable a harmful 3rd party will attempt and siphon up your traffic and analyze it behind they will reverse engineer your traffic in an attempt to find you). Considering logging, procedure, and encryption requirements is a terrific point to transition into the next area of our guide where we shift from concerns concentrated on our requirements to questions focused on abilities of the VPN companies. Selecting Your VPN Provider. What produces a VPN supplier? Aside from the most obvious matter, a good rate point that sits well with your budget, other components of VPN selection can be a bit nontransparent. Let's take a look at a few of the aspects you'll wish to consider. It's up to you to address these questions by checking out over the paperwork provided by the VPN service provider prior to signing up for the service. Even better, checked out over their documents and best vpn reddit then search for grievances about the service to ensure that although they declare they don't do X, Y, or Z, that users aren't reporting that they remain in reality doing just that. What Procedures Do They Assistance? Not all VPN protocols are equal (not by a long shot). By far, the protocol you want to run in order to attain high levels of security with low processing overhead is OpenVPN. RELATED: Which is the Best VPN Procedure? PPTP vs. OpenVPN vs. L2TP/IPsec vs. SSTP. You wish to skip PPTP if at all possible. It's a very dated procedure that uses weak file encryption and due to security concerns need to be considered compromised. It might be good enough to protect your non-essential web browsing at a coffee bar (e.g. to keep the store owner's child from sniffing your passwords), however it's not up to snuff for severe security. Although L2TP/IPsec is a significant improvements over PPTP, it lacks the speed and the open security audits discovered with OpenVPN. Long story short, OpenVPN is what you desire (and you should accept no alternatives up until something even better comes along). If you desire the long version of the short story, definitely have a look at our guide to VPN protocols for a more in-depth look. There's presently only one situation where you would amuse using L2TP/IPsec rather of OpenVPN and that's for mobile phones like iOS and Android phones. Currently neither Android nor iOS supports native OpenVPN (although there is third-party assistance for it). Both mobile os do, however, support L2TP/Ipsec natively and, as such, it's a beneficial option. A good VPN supplier will offer all of the above choices. An outstanding VPN service provider will even supply great documents and steer you away from using PPTP for the very same factors we just did. You must also inspect the pre-shared secrets they utilize for those protocols, considering that many VPN companies utilize insecure and easy-to-guess secrets.). The Number Of Servers Do They Have and Where? If you're wanting to access United States media sources like Netflix and YouTube without geo-blocking, then a VPN service with the majority of its nodes in Africa and Asia is of really little use to you. Accept nothing less than a varied stable of servers in several countries. Given how robust and extensively used VPN services have become it isn't unreasonable to expect hundreds, if not thousands, of servers across the world. In addition to inspecting the number of servers they have and where those servers lie, it's likewise smart to check into where the business is based and if that location lines up with your needs (if you're using a VPN to avoid persecution by your government, then it would be wise to avoid a VPN service provider in a nation with close ties to your country). The Number Of Concurrent Links Are Allowed? You might be believing: "I only need one connection, don't I?" What if you wish to set up VPN access on more than one gadget, for more than one relative, on your house router, or the like? You'll require numerous concurrent connections to the service. Or, possibly, if you're especially security oriented, you want to configure several gadgets to utilize numerous different exit nodes so your collective personal or home traffic isn't all bundled together. At minimum, you want a service that enables a minimum of 2 concurrent connections; practically speaking at the more the better (to account for all your mobile devices and computers) and with the ability to connect your router to the VPN network is more effective. Do They Throttle Connections, Limit Bandwidth, or Restrict Solutions? ISP throttling is one of the reasons lots of people rely on VPN networks in the very first location, so paying additional for a VPN service on top of your broadband bill simply to get throttled all over once again is a terrible proposal. This is among those subjects some VPNs aren't completely transparent, about so it helps to do a little digging on Google. Bandwidth limitations may not have been a big offer in the pre-streaming era, but now that everybody is streaming videos, music, and more, the bandwidth burns up truly quickly. Avoid VPNs that impose bandwidth constraints unless the bandwidth limitations are clearly extremely high and planned just to permit the company to police people abusing the service. In that vein, a paid VPN service restricting you to GBs worth of data is unreasonable unless you're only using it for occasional, basic browsing. A service with small print that limits you to X variety of TBs of information is acceptable, but truly limitless bandwith ought to be expected. Finally, checked out the fine print to see if they limit any procedures or services you want to use the service for. If you wish to utilize the service for file sharing, checked out the fine print to ensure your file sharing service isn't blocked. Once again, while it was typical to see VPN providers limit services back in the day (in an effort to minimize bandwidth and computing overhead) it's more typical today to discover VPNs with an anything-goes policy. What Kind of Logs, If Any, Do They Keep? Many VPNs will not keep any logs of user activity. Not just is this of advantage to their clients (and a fantastic selling point) it's likewise of big benefit to them (as detailed logging can rapidly take in disk after disk worth of resources). A lot of the largest VPN providers will tell you as much: not just do they have no interest in keeping logs, however given the large size of their operation they can't even start to set aside the disk area to do so. Although some VPNs will keep in mind that they keep logs for a very minimum window (such an only a few hours) in order to help with maintenance and best vpn reddit guarantee their network is running smoothly, there is very little reason to go for anything less than absolutely no logging. What Payment Approaches Do They Deal? If you're acquiring a VPN for securing your traffic against snooping Wi-Fi nodes while taking a trip, or to path your traffic safely back to the United States, confidential payment approaches aren't likely an extremely high top priority for you. If you're acquiring a VPN to prevent political persecution or dream to remain as confidential as possible, then you'll be considerably more interested in services that permit payment through anonymous sources like cryptocurrency or gift cards. You heard us right on that last bit: a number of VPN suppliers have systems in location where they will accept gift cards from major merchants (that are totally unassociated to their business) like Wal-Mart or Target in exchange for VPN credit. You could purchase a present card to any number of big box shops using money, redeem it for VPN credit, and avoid using your individual charge card or checking info. Do They Have a Kill Change System? If you are depending upon your VPN to keep your activities even slightly confidential, you require some complacency that the VPN isn't simply going to go down and dispose all your traffic out into the regular internet. What you desire is tool known as a "kill switch system". Excellent VPN suppliers have a kill switch system in place such that if the VPN connection fails for any reason it automatically locks down the connection so that the computer system doesn't default to utilizing the open and unsecured internet connection. In case you beloved this short article and you want to acquire more info regarding best vpn reddit i implore you to pay a visit to our own internet site.
1 note
·
View note
Text
Who has two declaws and just spent way too much time setting up a personal wiki on a raspberry pi?

This Kraid!
<venting mode>
If someone told you that setting up a wiki was easy, someone lied.
Like goddamn, I spent 2 hours trying solve a login problem that, from what I can tell, can be caused by approximately 17 different things. My version of the problem was fixed by changing CACHE_ACCEL to CACHE_ANYTHING in localsettings.php. There's like 16 other ways of fixing that problem, and none of them seem to be related to one another. I HAD TO LEARN SQL SHIT! AND NOTHING I LEARNED THERE FIXED ANYTHING! NOT A GODDAMN THING!
Anyway....
I can't even remember why I wanted to set this thing up now. I think I was going to use it for note taking, or something?
I would like to give a huge, huge thanks to whomever cooked up ssh back in the day. No sarcasm, being able to control my pi from a terminal emulator on my laptop turns out to be INSANELY useful!
Also a huge thanks to whomever did the scp command, also hella useful for getting files from the laptop to the pi and vise versa without having to set up ftp servers or shutting down the pi and ripping the msd card out every time.
Like, seriously though, fuck SQL. And it wasn't even the thing causing the problem, it was just that God awful an experience. Well, one of the problems. There was the chmod thing. And the learning curve of Apache on Debian - I learned a little bit about a decade ago on Windows and it tripped me up a little, but that's on me.
And god bless Linux's ability to create aliases. So much repetitive typing saved by that simple ability.
Alias realias="source ~/.bashrc"
Alias restart="sudo systemctl restart apache2"
Alias nanowiki="sudo nano /path/to/LocalSettings.php"
</venting mode>
Is it possible to, I dunno, set up a router to translate certain urls into internal ip addresses? Like how some of those wifi extenders can do for accessing their setup server. Like resolve http://something.here into 192.169.x.y instead of hitting up an external DNS server?
#Wiki#wikimedia#Personal wiki#personal jesus#sql#sql server#Ssh#debian#raspbian#azula#the shadows#Fuck sql#dns#dns server#bash#Bash_aliases
1 note
·
View note
Text
In ENGLISH- Episode3- HOW TO DISPLAY RASPBERRY PI ON LAPTOP WITH VNC VEWEIR & RASPBERRY PI ONLY, WITHOUT USING ANY OTHER SCREEN.
In ENGLISH- Episode3- HOW TO DISPLAY RASPBERRY PI ON LAPTOP WITH VNC VEWEIR & RASPBERRY PI ONLY, WITHOUT USING ANY OTHER SCREEN.
The New Method to Setup Raspberry Pi (2022 Update) Remote control of raspberry pi. Dear Friends, Innthis blog we will proceed as how get display of raspberry pi either on our Laptop or on Mobile. Process id same for both. We need to Download “VNC Viewer” & “PuTTY” software on either Laptop or Mobile, first. Link for VNC Viewer & PuTTY software are as…

View On WordPress
#64 bit raspberry pi#HOW TO DISPLAY RASPBERRY PI ON YOUR LAPTOP#HOW TO GET IP ADDRESS OF RASPBERRY PI#HOW TO IP ADDRESS ON MOBILE#How to raspberrypi#how to raspbian#IP ADDRESS SCANNER#Mini Computer Raspberry Pi#PuTTY#Rasbian OS#RASPBERRY PI#Raspberry Pi 4#Raspberry pi desktop#Raspberry pi setup - 2022#Raspberrypi software Installation#raspbian#REMOTE CONTROL OF RASPBERRY PI ON LAPTOP#Screen#SSH#VNC VIEWER ON LAPTOP
1 note
·
View note
Note
How hard is it to set up a pi-hole? I want one for my house but my IT Skill is 05/100 My 'following instructions' is 98/100 though.
it's not super difficult imo, there are lots of good tutorials out there to do it.
Raspberry Pis themselves are simple to use, but there are some things that aren't included that you need to get it running, mostly adapters of different kinds since the ports are all mini and micro variants. vendors sell all these in kits together with the RPi a lot of the time which is way more convenient. this is the one I bought, but there are kits on that site for other models as well so you can make a note of what's included in those to determine what you'd need for a specific model
the Pi-hole installation itself isn't complicated at all, just answering yes or no questions basically. the hardest part tends to be setting your router up properly, since some don't let you change the settings you need, specifically the option of using static DNS. you can get around this by telling each device to use the Pi-hole, but it's more tedious
after you install it you can configure everything graphically in a web browser so you only have to use the command line a few times during the setup
this tutorial is pretty straightforward I think. it tells you pretty much exactly what you need to do for each step. and if you happen to run into some sort of issue feel free to ask me, i'm not exactly a tech expert yet but it is my job lol
edit: just realized that the tutorial I linked does the device-by-device method, which is fine but like i said, tedious. the more effective thing is going into your router settings (via the router's local IP address in a web browser) and changing the static DNS option there to be the same IP as your Pi-hole. that may or may not be an option depending on your setup but it would force everything on the network to use it
1 note
·
View note